Wednesday, December 15, 2010

Blocking

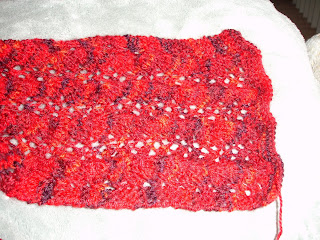
I blocked my first knitting project yesterday. To block knitting, you get it wet, stretch it into the shape you want it, then let it dry. You take something that looks like this:


Do this to it:

And eventually end up with something like this:

k

Monday, November 15, 2010

Soapy results

The lavender soap that I added the blue dye to is in the back. It was peachy when we poured it into the molds, but has become a lovely purple color. I think it's close to the perfect color for lavender soap.

In the front is the Crisco soap. It didn't harden as much as the others, in fact it's still roughly the consistency of fudge. My online resources say that Crisco soap is a hard soap, so I may have screwed this one up somehow. My alternate plan for this soap is to redissolve it in hot water and make it into a liquid soap (like for soap dispensers and dish soap). I'm sure it'll be good for either that or as laundry detergent.

Here's a closeup of the weirdly fudgelike Crisco soap. It might dry out still.. maybe..

This is the Tahitian Vanilla scented soap that's supposed to turn dark brown as it cures.

The shea butter soap looks lovely. It's a nice golden brown color with little flecks in it. I'm not sure about the pink spots, but they sort of generally blend in. This mold was somewhat poorly shaped for a soap mold, so we have blocks of soap that sort of look like brownies.

The white soap in the back is the peppermint castille soap. It looks pretty much like generic soap. TD cut these two soaps (and the lavender one). He did a much better job than I did - these actually look like bars of soap.

The bright pink one is the jasmine soap. I'm concerned that the color may transfer to skin when the soap is used. We'll find out in another couple weeks when the soap can be used. It has to cure for several weeks to complete the saponification process. If you use it too early, there's still lye left in it and it's really harsh (to the point of burning you if it's way too early).

I spent the morning designing a label to put on the bars so that they look a little more like gifts. If anyone has any idea on how to package soap so it looks nice as Christmas presents, let me know.

Thursday, November 11, 2010

Crisco soap

So I'd bought a 6 pound can of Crisco to make soap with. I'm not sure what I was thinking - I only had one soap recipe that called for Crisco and we never eat the stuff. This morning, I decided to make up one last batch of soap using Crisco.

Turns out that you can make soap using only Crisco and lye. Turns out that multiplying the recipe by 1.67 exactly used up my remaining Crisco and lye.

The Crisco soap is destined to become laundry detergent. Since I put 5 pounds of Crisco into the recipe, I should get out roughly enough laundry soap to last me until I die.

Wednesday, November 10, 2010

Soap Making

TD and I decided to make soap to give as Christmas gifts this year. I didn't can enough this past summer to go around.

I took a soap making class through PCC a few months ago. Then, one day a few weeks ago, I abruptly decided that we should try it. I bought the supplies and today we're off and running.

The one problem with the calculations below is that some of the measurements are in fl oz, while all of the ingredients are added by weight. Total cost of all ingredients purchased: $141.33

From Costco:
$8.99 for 160 fl oz Canola oil = $0.056 / fl oz
$17.89 for 170 oz olive oil = $0.105 / fl oz
$6.99 for 96 oz Crisco = $0.073 / oz

$11.00 for 16 oz Shea Butter = $0.687 / oz
$21.00 for 128 fl oz Coconut oil = $0.164 / fl oz
$23 for 128 fl oz Palm kernel oil = $0.179 / fl oz

From the True Value Hardware across the street:
$3.99 for 16 oz 100% lye drain cleaner = $0.25 / oz

From Sweetcakes soapmaking supplies:
$7.99 for 2 oz peppermint = $4.00 / oz
$12.50 for 2 oz lavender = $6.25 / oz
$6.00 for 2 oz jasmine fragrance = $3.00 / oz
$7.00 for 2 oz Tahitian vanilla = $3.50 / oz
$7.00 for 2 oz Vanilla lace = $3.50 / oz

The basic idea of soap is pretty simple. You mix melted fats and/or oils with a strong base (lye) and it chemically modifies the triglycerides into soap molecules. As the chemical reaction proceeds and the mixture cools down, it gets opaque and thick like pudding. This condition is called "trace" (you can see traces of your stir marks).

Roughly 95-100 degree F lye being poured into warm oil of same temp.
Using a stick blender to mix the lye into the fats.
After some mixing, but before trace.
I don't have a trace picture, but if you look on the surface of this poured soap, you'll see bumps because it was solid enough to partially hold its shape.

We have a 1/4 batch of Rachel's "tried and true" soap from the Miller Soap website. We scented it with 1 oz of Tahitian Vanilla fragrance oil, which smells very floral. The Sweetcakes website that I ordered the fragrance oil from says that this particular one turns dark brown, so we didn't try to color it. It's been poured into a black plastic Thai restaurant take-out box. This batch cost $6.41 to make.

The second batch we made up was a full batch of Sudsy All-Vegetable soap. I tried mixing it with a hand blender and it gets to trace lots faster than stirring by hand (which we did with the first batch. This batch is colored a horrible pink (we were trying for purple, but the dye we have doesn't seem to work well) and is scented with 1 oz Jasmine Fragrance. Overall, it kind of reminds me of hotels. Total cost: $16.44.

Third, we have a recipe that I got in a handout from the class I took. I tried to color it blue and ended up with a weird gray right after I added the dye, which slowly changed to a peach color as the mixture cooled. I give up on these dyes. It's originally from Rainbow Meadow, but I can't find the exact recipe on their website. Total cost: $21.65. I'm reproducing the recipe below for my own reference:
28 oz coconut oil
18 oz palm oil
42 oz olive oil
12.7 oz lye dissolved in 33 oz water
Let fat and lye cool to 92 deg F, then mix until at trace.

Next, I found a recipe containing Shea Butter, which costs $15.03. This one's scented with Vanilla Lace.

Last is a batch of Favorite Castille II (which it turns out is soap made from mostly olive oil; who knew?) scented with 0.75 oz peppermint essential oil. It costs $18.26.

Sunday, October 24, 2010

I've been gone so long, blogger forgot who I am...

I had to sign back into blogger today when I tried to get to this blog to post it. My web browser also didn't remember the website and autofill it for me. This obviously means that I've been away too long. I'd blame the school year starting back up, but really I think it was my newfound motivation and level of accomplishment. When I accomplish more, I spend less time on my computer. When I spend less time on my computer, it doesn't occur to me to blog about things.

In other exciting news, I'm an aunt! My brother and his wife had a little girl. I've been crafting things for her for months now. Here's a few of my recent finishes.

Set of Dr Seuss burp cloths - they're not into pink for a girl, so I went with unisex, but fun.

Matching Dr Seuss bib that needs a velcro dot for the closure.

Set of wipies that are made with bamboo / hemp fleece on one side and hemp / organic cotton fleece on the other side. One of them is softer than the other (I think it's the hemp / cotton), but both are really nice. They're serged around the edges because I got a serger! It's this one. I picked it based on the amazon.com reviews. So far, I love it.

Another set of owl burp cloths that I made for my childhood best friend who just had her second child, a girl. They were expecting a boy so I thought I'd make some cheerful slightly-pink owl accessories for her.

A knitted baby sweater based on the Helena pattern by Alison Green Will on Ravelry. It's made with this hand painted sock yarn from knitpicks.com.

Here it is from the back.

I decided to make the smallest size, which seemed like a good idea at the time. It's smaller, so I'll finish it faster, right? Well, it turned out so small that the baby will only be able to wear it for about 2 weeks, and who puts a tie-on sweater on a newborn? Oh well. It'll look cute on a teddy bear for years to come.

After I finished that sweater project, I needed a new knitting project. I decided to make hats with really bulky yarn. Here's what I ended up with.

It's probably sturdy enough to be a flower pot.

Rags was unimpressed.

I didn't take pictures of the stuff I tie-dyed recently. For some reason, I always forget to photograph that particular craft. I did a bunch of bamboo socks for baby, a few other random baby things I had lying around, and then swiped a few of TD's white cotton undershirts (I'm not sure if he likes them better or worse now that they're blue and purple).

I also forgot to take pictures of the two wetbags I made (also for baby). They're based mostly on this tutorial. My brother and his wife had registered for this on amazon.com, but I decided that I could make the same thing for way cheaper. I ended up making two: a roughly 8"x11" one and a larger one with an outer non-waterproof pocket. They're lined with PUL fabric, which is a waterproof (but apparently breathable) fabric that people use for making cloth diapers. It was a little irritating to sew because it sticks to the sewing machine, but it wasn't too bad. The worst part was putting in the zippers. Zippers are my nemesis.

I mailed all the baby stuff off to my brother and baby on Friday. Hopefully they will actually use some of it. I forgot to mail out this hat that I'd made for her quite a while back. I'll have to send another package... but that's ok - I got a onesie that says "My Aunt Rocks" that I have to send her, too.

I went to the October Portland Modern Quilt Guild meeting. Twice, actually. The first time was two weeks ago, which didn't really work out well since the meeting was this past week. There was a pretty cool art show on the street next to PCNA, though. I bought a headband that I'm fairly happy with and I enjoyed looking at the art.

I'd hurried and stressed about having my pincushion ready for the swap at the meeting. I got it done the night before I went to the meeting (for the first time), then brought it home and it sat inside its paper bag for another two weeks. Sadly, I didn't take a picture of it at any point.. The one that I got in the swap is pictured on the PMQG website. It's the colorful round one that's the third one down. I'm insanely pleased with it.

I'm sure there have been other crafts that I've finished. I just have to think about it and search around the house for unphotographed crafts to snap pictures of and post about.

Wednesday, September 8, 2010

Sharon;s baby beanie


Sharon's baby beanie, originally uploaded by A Scattered Squee.

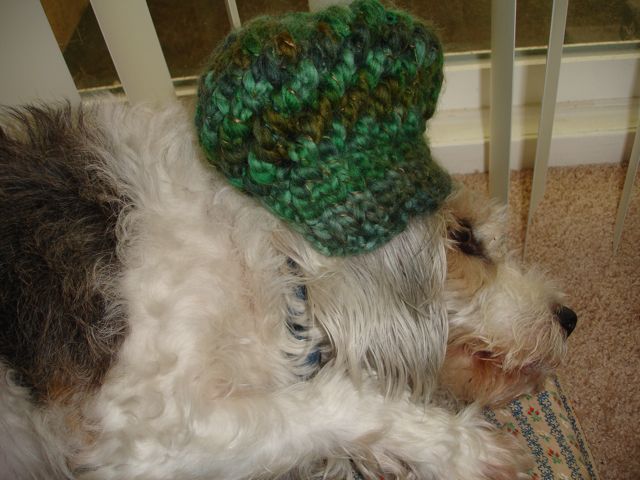
I made a second tiny hat from the same pattern as this other tiny hat that I made for my upcoming niece. They're both from the Bananahead Baby Beanie pattern from ravelry.com

My friend Sharon (who I know from grad school) is having a baby and I saw her and her husband this past weekend. I whipped up a quick baby hat last week before I saw them.

Chinese waves dishcloth

I decided that we should transition from using sponges to using washable dishcloths. I feel like the sponges harbor icky things because they don't get run through the dishwasher often enough. I can just throw dishcloths in the laundry when I wash the dishtowels and I think it'll keep them cleaner. It hopefully will be a more ecologically sustainable way to keep my counters clean.

Also, I get to try different knitting patterns out on a relatively small scale.

Moo's fingerless mitts


Moo's fingerless mitts, originally uploaded by A Scattered Squee. They're Sashka Macievich's Twin Leaf Fingerless Gloves from Ravelry.com

I'm really into knitting right now. This is the first fingerless mitt that I finished (I've finished both of them at this point). It's for my mother. She likes red.

However, I just saw her this past weekend and I'm worried that her hands are way too small for these. I may have to make a smaller pair for her.

The mitts match this Strangling Vine Lace Scarf:

Friday, August 27, 2010

BugPack

I bought a pattern for a small backpack way back when I started sewing again (so about a year ago, now). I never posted about it on here because it was finished before I started the blog.

I love it. I carry it with me when I need a larger bag than just my purse. For example, I take it with me when I go to the Portland Saturday Market in case I make a purchase.

I had formulated this plan to make a smaller version for my friend's son. He's just turned 3 and she's pregnant with his little brother. I thought that baby bro will probably be getting a lot of attention and presents in the near future, so I'd make a few things for big bro.


I ended up making it just about the same size that mine was. I was going to cut it down, but just sort of didn't do it for some reason. I made the pocket on the front more 3-D so it could be filled with important treasures. It also has a sort of pockety thing on the inside that fits a little stainless steel water bottle I found for him at a garage sale. I couldn't get a good picture of that part because it's too dark inside the backpack.

I need to go get some cool buttons for the pocket and top flap and a drawstring for the top, but other than that it's finished. I whipped it out in one amazing evening of sewing productivity. I'm very pleased with it. I hope he likes it.

Thursday, August 26, 2010

Halloween Wave Quilt

To appease Ciara, here's pictures of my completed New Wave Quilt from Elizabeth's pattern on Oh, Fransson!. I hadn't posted them yet for two reasons: first, because it's a gift quilt and I wanted to give it to the person before I posted pictures of it online, and second, because my boyfriend was supposed to hold it for me while I took pictures and we kept forgetting.

So here's a picture I took of it on my own. It's a lot harder to photograph an entire quilt (even a lap-sized one) when no one is holding it.


It's smaller than the real New Wave quilt because I didn't have enough different Halloween fabrics. I also decided to not trim the edges straight and did the binding around the points of the diamond shapes. It wasn't all that hard and I think it looks cool.

One of my friends had asked if I would make her a quilt if she bought the fabric. I agreed, but then we never got around to shopping for the fabric. She had mentioned that she would be interested in a Halloween themed quilt and I already had all this fabric on hand (for what, I have no idea - why on earth would I have purchased this much Halloween fabric??). It took me only slightly over a day to whip the quilt up from start to finish.

Part of the reason it was so easy was because I had one of Jill's (Made On Main Street) fabulous acrylic templates. It makes this pattern super easy to cut out and once cut, it's fast to sew together. Here's her etsy shop, although she doesn't have a New Wave template posted.

After I finished the quilt, I had a bunch of fabric left over that I wanted to use (including bias-cut binding that I really didn't want to go to waste). I've been really into these pieced hexagons recently (from this potholder tutorial originally), but the triangles are a pain in the butt to cut using a regular rectangular ruler. Jill made me more fabulous templates for 45 and 60 degree triangles, which made it totally easy. I think I'll make an entire quilt from them next.

In keeping with the theme of angled binding, I decided to finish the pillow as a hexagon rather than making it square (like I did with my couch cushion pillow). This pillow is stuffed with random batting and fabric scraps that I'd saved for stuffing the dog bed. Rags will just have to wait for more scraps to come his way.

Quilt and pillow are headed to their intended recipient this evening, so I'll report back on how she likes them.

Wednesday, August 25, 2010

Baby Sweater


Baby Sweater, originally uploaded by A Scattered Squee.

I knitted a whole sweater!

Note to self: check gauge more carefully before starting sweater project. This sweater won't fit the baby until it's about 2.

Monday, August 16, 2010

Laundry Detergent Woes


I was running low on my homemade laundry detergent so I decided it was time to mix up another batch. I made a dry version the first time and it seemed to work fine. In the interest of testing different types, I decided to make a liquid type this time. I'd saved the big jug that our last purchased laundry detergent came in so that I could give it a try.

I (mostly) followed a recipe from this website again. I went with recipe #1.

The worst part of the experience last time was grating the soap. Ivory soap falls into tiny particles at the least provocation, but the Kirks Castille soap that I'd purchased especially for this project last time does not grate well. I figured I'd outsmart the soap by using technology, so out came the food processor.

Turns out that entire bars of soap cannot be processed in a 2-cup food processor. After judiciously chopping a bar into eighths, it more-or-less processed into powder or small chunks (with a few larger chunks left). I figured that, since the first direction is to dissolve the soap in hot water, the chunks would dissolve more easily than I could food process them.

Wrong. If you boil water containing a lot of dissolved soap, you get a pot that quickly fills with bubbles and threatens to boil over. Soap-water must be simmered. At a simmer, grated soap and small pieces dissolve quickly. Larger pieces take forever.

This is what my soap-water looked like after it had been simmering for about 20 minutes. Note to self: next time, grate the soap entirely. It's worth the extra time.

The recipe calls for 2 cups of grated soap. One bar of Kirk's produced slightly less than 1 cup, so I food processed 2 bars of that, then did a bar of Ivory so I'd have plenty. This gave me around 2.5 cups of grated soap. I dissolved it in water, then brought it to a boil and added 2 cups of washing soda and 2 cups of borax.

At this point, I think I should have added more water. I probably boiled off a substantial amount of it while simmering and, although I did add more during the simmering process, once I added the washing soda and borax, I had something nearly the consistency of ice cream. It was really hard to mix the washing soda and borax in, so at least one of them had not fully dissolved when I poured the mixture through a funnel into the detergent container. There were dry clumps of white stuff at the bottom of my pot.

I added about 2.5 quarts of hot tap water and shook up the mixture well inside the detergent container. Fabulous. Laundry detergent. Or is it....

The next morning when I looked at it, the entire thing had solidified into one large mass of solid whitish soap-stuff. I guess I used too much soap and not enough water. Or something.

It's been hot-hot-hot here the past couple of days, so my first thought of heating a pot of water and re-liquifying the detergent seemed like a profoundly unpleasant idea. But how else does one heat an entire container of laundry detergent? One leaves it on the front porch in the sun in the 95 degree weather!

Sitting outside for the entire day liquified the detergent to the point where I was able to add another quart of water and mix it in. I left it on the porch to think about its misdeeds.

Apparently it didn't feel in the least bit sorry because it was solid again the next morning. I left it to warm and then filled the rest of the bottle up with hot water. It seemed liquid enough.

However, I appear to have been thwarted again. After cooling, the detergent is oddly gelatinous and too thick to pour out of the container. There's no more room to add additional water, so I'm going to pour it into a bucket (which is actually what the website advises originally) and see if I can use it as a sort of laundry jelly.

Go check out this giveaway...


Normally I don't cross-post giveaways because it irritates me. However, there's a chance for a really awesome prize here and I wanted to share it.

Isn't this thing cool? It's like a whole room in a box.

Lovely Little Handmades is having a giveaway for a cutting board, which if you win, you will then be entered into the Original Scrapbox drawing for a Limited Edition Workbox.

If I had more disposable income, I'd have one of these already.


QUILT-a-long

Christina from A Few Scraps is doing a quilt-a-long. It's actually a quilt-a-long, too... not just a piece-a-long. We're going to follow along free motion quilting a project. I'm excited!

Thursday, August 12, 2010

Baby Hat!


Baby Hat!, originally uploaded by A Scattered Squee.

My first real completed knitting project (ignoring the two scarves, which were really just practice). The pattern is "Bananahead's Baby Beanie" by vibegrrl. I downloaded it from Ravelry.com.

The yarn is currently a mystery. I got it at Fabric Depot with a 40% off coupon. I thought I saved the tag, but now it's disappeared.

edited to add: I found the tag - it's Queensland Collection Haze made from 60% corn viscose and 40% cotton. Weird.

It's for my will-be-born-in-November niece.

Sunday, August 1, 2010

Rampant Productivity

Every once in a while, I get on a productive streak. This time, the productive streak was caused by my quilting friend Ciara, who stayed over last week. She brought over these awesome teal and green fabrics with which we made a pillowcase that she is giving as a gift. She left me the fabric we didn't use in the pillowcase and I was so inspired that I made a pillowcase of my own.


The two pictures above are the front and back of the pillowcase. I made the hexagonal side first (based on this tutorial from Jaybird quilts), then used the rest of my sewn together strips as the border for the square side. It matches nothing in my living room except for the potholder pictured below.

Then, being in a hexagonal sort of a mood, I made this potholder using a bag of strips that Ciara had left me from another quilt. The back looks the same as the front except that the center didn't quite match up as well.

And it's not just me that's being productive. My eggplants and tomatoes are getting in on the action, too! I'm so proud of them.


Monkey Ball!


Monkey Ball!, originally uploaded by A Scattered Squee.

I made a ball to go with the Sock Monkey Quilt for my upcoming niece. It's made of paper pieced pentagons using this tutorial. I stuffed it fairly firmly with batting scraps. I'm pleased with how it turned out.

Sunday, July 18, 2010

Bumblebees


There's a family of bumblebees that has set up house next to the stairs onto our back patio. I caught one in a mason jar so I could take its picture and try to identify the species.


I think that it's Bombus caliginosus, B. vosnesenskii, or B vandykei. All of those species are found in Oregon and they all look pretty similar to me.

After reading about bumblebee nests, I've learned that they normally only live in them for a couple of months. We're planning on leaving our bumblebees alone until they move on.

Thursday, July 1, 2010

A bounty of peas

Well, bounty might be stretching it... but a smallish bowl of peas, anyhow. From my garden!

Saturday, June 26, 2010

Completed, but not posted


I participated in a pincushion swap. After reading my partner's blog, I decided she liked hexagons and found a picture of a pincushion that looked pretty cool.


I cut up random pieces of batting into a billion tiny pieces and used that as stuffing. I actually sent it to my partner about a week ago and she got it already so I know she likes it.


My grandmother commissioned me (with money exchanged, even) to sew her 8 placemats for her TV trays. This was sometime back in March or April. I decided that I really had to finish them.


She got the package earlier this week and sent me back a thank you card with more money. She loves them.