Friday, April 30, 2010

Giant cone of thread!!

Fabric Depot is having a 50% off sale on Gutermann thread today and Saturday. Since that's the thread I use, I'm headed out to get some (as soon as the boyfriend changes out of his PJs).

I'm looking for giant cones of thread (3000m) because they're the most economical and there's just a few colors that I use over and over for my piecing (and a good chunk of my quilting). White, off-white, grey, and black. Giant cones cost around $23, which means $12 for 3000m once it's 50% off. I'm excited.

I did, however, have to construct a giant cone holder.

The thread is sitting on top of an old degu toy that they chewed all the other parts off of (I washed it well with vinegar before putting my thread on it). Yes, that is a wire coathanger duct taped to the back of my sewing machine.. but I needed something to hold the thread up above the machine so it wouldn't get tangled.

Thursday, April 29, 2010

Love U Baby Quilt

Love U Baby Quilt Top, originally uploaded by A Scattered Squee.

Tuesday, I made a quilt.

I had bought a charm pack of Love U fabric at some point in the past (I'm sure it was either on sale or I used a 40% off coupon at Fabric Depot) and, while rummaging through my stash, I came across it and decided to make it into a quilt.

It's based on this stacked coins tutorial, but doesn't exactly follow the pattern. I didn't buy any new fabric specifically for this quilt, which pleases me. The back is a piece of flannel that I bought as a remnant a while back (love remnants!!).

I took advantage of literally 5 minutes of sun to run the quilt out and take some pictures. The lawn was pretty wet, but luckily it's a light quilt so it didn't bend the grass over and get muddy.


The one disappointment is that I forgot to adjust my tension before I quilted, so it's got a few places where you can see loops pulled through from the top.

Construction details:
Piecing thread: Guterman 100% cotton in a cream or light beige color.
Batting: probably warm&natural cotton - used a left-over section.
Quilting thread: white Guterman 100% poly - I didn't have any white cotton thread.
Tension: forgot to increase. Whoops. Live and learn.

Saturday, April 24, 2010

PMQG sewing night

Tonight was the Portland Modern Quilt Guild's sewing night at Modern Domestic. It's a way fun place. They have all the supplies there, you just bring your project and work on it. And they have NICE equipment.

I brought the tiny pinwheels that are going to be the sashing of my pinwheel party quilt. There's 24 of the little buggers and they're a pain in the butt to sew together. I had already done 8 of them (blue and purple); tonight I completed the other 16 (red, orange, yellow and green). I did a pretty good job matching the points, but it's tough.

It was really cool to see everyone else's projects. I didn't really need any of Mod Domestic's supplies, but it was totally worth the cost to just hang out and sew with a bunch of neat ladies. I'm really looking forward to doing it again.

I also got to rummage through Mod Domestic's scrap bin and I found TWO pieces of fabric with squirrels on them! Heaven!

Tuesday, April 20, 2010

Spring Potholders

The Portland Modern Quilt Guild is holding a potholder swap at its next meeting. I decided to use up some of the leftover fabric from the Spring Quilt that I gave my grandmother.

The large square piece was the first one I finished (and was originally going to be the only one), but at 10" square, it's really too large to be a potholder. It has two layers of Insul-brite insulating batting inside it, which makes it pretty stiff.

The two smaller heart-shaped potholders actually work as potholders. They only have one layer of Insul-brite and one layer of regular batting, which makes them more flexible.

I debated whether I should wait to post this until after the swap, but decided that it wouldn't matter either way. The potholders are going to be chosen while inside a paper bag so how could it matter if someone saw mine early?

Pinwheel Quilt-A-Long

I finally got started on my quilt for the Twiddletails Pinwheel Quilt-A-Long on Saturday. I had an excellent day of sewing tiny pinwheels.


Those are a few of the best pictures of my pinwheel blocks. I've finished all 8 blocks for which patterns are currently posted.

There are also going to be twenty-four TRULY tiny 2" pinwheels in the sashing and border. I've done 4 of those (the blue ones). 2" pinwheels are very time consuming for the size of the piece you end up with. It's very fussy getting all the seams ironed open and getting the points in the center to match up.

Monday, April 19, 2010

Spring to Finish!

Jacquie at Tallgrass Prairie Studio is holding a "finish your projects" challenge. The goal is to encourage everyone to finish some of the projects that they currently have started. It runs from now until the end of May.

spring to finish big


Here's my list:
1. Paintbox quilt (needs to be quilted and bound)
2. Cherish Nature quilt (just started)
3. Happy Stacker baby toy (x2)
4. Pinwheel quilt (assuming that all the blocks are published by then)
5. Sock Monkey baby quilt

I'll have to think about what my reward will be if I get all of these done...

Saturday, April 17, 2010

Spring Quilt - Completed!

I brought my spring quilt on the flight down to my Grandmother's last weekend. She lives in the Bay Area, so it's a pretty short flight, but I had over an hour in the airport waiting, then an hour and a half on the plane, then I finished the binding that evening.

Granny greatly admired the quilt, so I left it with her. It's got a somewhat thicker batting in it than the first quilt I made for her, and it's a little bigger. It's nice for her to keep on her bed or to nap on the couch with. The other one works as a lap quilt for when she's sitting in her rocking chair watching TV.

I forgot to take pictures of it before I left, so my mother took some for me. Here's what I ended up with for the quilting. You can see the pattern pretty well on the purple block. All the solid blocks are quilted with the same overlapping heart pattern. You can't see the quilting at all on the patterned areas.

I had to wash it twice to get the marks out from the fabric marker I used used to trace the quilting patterns. I used a blue washable marker (which came out very well, but which didn't last for the whole quilt and kept drying out) and a green mechanical chalk pencil (which was the one that didn't wash out easily). The washable marker marked well and came out easily, but I could do about one block's worth of pattern before I had to stop and turn it upside down to rest for a while and get the ink flowing again. The mechanical pencil was harder to mark with and didn't come out as well, but also lasted much longer. I need to try other marking utensils because I'm not all that happy with either of these.

It's backed with part of a sheet that I bought at Goodwill. The binding is short pieces from the same jelly roll as the patterned fabric - four different colors of the same print.

It's about 45" wide and 65" long.
Construction details:
Piecing thread: Gutterman 100% cotton in a cream or light beige color.
Piecing needle: size 75 quilting needle (now my standard - I love these needles).
Batting: probably warm&white cotton - I used two left-over sections of batting from other projects. I think they were both the same kind, but I'm not 100% sure
Quilting needle: same.
Quilting thread: same.
Tension: increased to about 6.

Tuesday, April 13, 2010

Scrap usage

One of the things that I really like about quilting is its history as a way to use up every little scrap of fabric. That appeals to the part of me that recycles, has a worm compost bin and uses fluorecent light bulbs.

When I quilt, I save all the scraps. They get divided into three groups: scraps larger than 2.5" square, scraps smaller than 2.5" in at least one dimension (a 1" x 18" strip would fall into this category), and scraps that seem too small to be worthwhile sewing into anything (tiny triangles, strips cut off when straightening edges, bits of batting).

I store the tiniest of pieces in plastic grocery bags and use them for stuffing.


I used the first bag I collected to stuff a poinsettia pillow I made for my aunt and uncle for Christmas. I filled a second bag and when the third got full, I decided I needed to make the next project to stuff.


The new dog bed is made of 2 pieces of fabric that I got at Goodwill (the brown flower top and the weird brown-and-purple mushroom fabric I used for the sides) and a piece I got free from a friend (purple bottom fabric you can't see). I'm going to make a removable cover for it (someday) so that I'll be able to take that part off and wash it.

It's roughly 24" x 36" and the sides are about 3" high. I didn't calculate exactly how much volume is in something this size. I thought that two stuffed grocery bags full of scraps would fill it up.

Nope. Nowhere close. I ended up leaving an opening on the side so I could continue stuffing it as I produce tiny scraps. I just added some more this morning, and TD (who was straightening my fabric for me) added some bits last night.

Rags is quite pleased with it really. He doesn't seem to mind that it's a bit lumpy and understuffed.

Sunday, April 11, 2010

Check out this giveaway

I Have A Notion (IHAN) is doing an amazing giveaway the whole month. There's still time to sign up for ALL the drawings, too!

Check out:

Monday, April 5, 2010

It's spring!

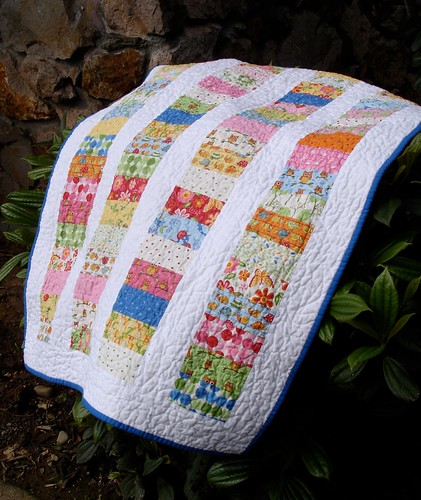
I mentioned the spring quilt using the Eden fabric line in an earlier post. Posting about it seems to have motivated me to actually get started on it. After a great deal of thought, I decided on this design:

I had considered several other designs, including one that was very similar to this one except that each solid was associated with one of the prints rather than being all together.

I like the way this turned out, but I think it's interesting how much more pronounced the solid colors are than the prints. I had figured that the prints would stand out more than the solids because of their interesting patterns, but the large solid blocks are the part of the quilt that draws the eye.

The assembly of this quilt required a lot of organization. The longest section of each print is the center of one block, which means that each of the four corners of the block have a different solid. It was sort of challenging to keep everything organized enough to get the right solids in the correct corner of each block. Of course, I'm so naturally organized that this wasn't a problem and I didn't have to rip out a single seam (NOT).

The white is Kona snow that I'd bought as a remnant. It was a weird 60" wide piece of fabric, but it worked great for this application because I didn't have to sew many pieces together to make the border.

Here's a close-up of the border. I was originally going to put a border of squares around the whole thing, but the central part ended up being a lot more square than I had pictured, so I just added squares onto two ends to make it longer compared to its width.

One of the things that I had wanted to do with this quilt was to practice my free-motion technique by doing some sort of cool design in each of the blocks. I bought this plastic stencil that happily fits just inside my print blocks. I tried to take a picture of the actual quilting, but the thread blends in too well. If you look at the picture above (of the border) you can barely see the quilting.
I'm still trying to decide how to quilt the solid areas. Should I use the same cream colored thread that I'm using for the prints? It'll really show up on those bright solid colors, so all my mistakes will show badly. I think that contrasting quilting will also make the solid colors stick out even MORE which really isn't my goal. The alternative is to use a matching thread color for each of the blocks, but the back is a white fabric with little pastel flowers on it, so colors will really show up on that. I could try using the cream in my bobbin and the solid for the top thread, but I'm afraid that if my tension isn't perfect, dots of the wrong color will show up on the wrong side and just look stupid. I'll probably have to try several variations and see what I like best. Any thoughts?

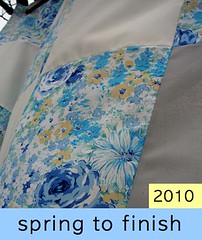
I haven't decided how I'm going to quilt the borders yet. It's a work in progress. It does make my kitchen feel very much like spring, though.

Saturday, April 3, 2010

Mmmmmmm

A lovely way to start the morning.

Friday, April 2, 2010

In progress

Right now, I have a TON of quilts in progress.

My paintbox quilt top is finished. I need to piece a back for it and get it quilted, but I haven't felt like doing the quilting part yet. This is mostly because I'm not sure HOW I'm going to quilt it. I want to do something more interesting than just an overall stipple. I'd really like to do something in each of the squares, but I'm not sure how that would look.

I have fabric all picked out for a very springy quilt from Moda's "Eden" fabric line. I keep changing my mind about the design. I have a jelly roll of Eden and jelly roll strips from a pastel solid roll. I keep almost starting it, then changing my mind... but if I don't get it going soon, it won't be spring anymore!

I just bought fabric (sshhhhh, don't tell my boyfriend) from "Cherish Nature" for an entirely different quilt. It's going to be awesome, but it is one more project to get working on.

Instead of working on any of these projects that I've actually purchased fabric for, I'm once again sewing tiny scrap pieces together to make blocks. I just find this type of quilting to be very relaxing because I don't have to worry about perfect 1/4" seams or cutting blocks out straight on the grain or making sure things don't get out of order. It also appeals to my sense of economy and using up all the tiny little pieces.

The first one I started is a maverick star quilt based on the tutorial on Quiltville.com. I think they're very cool looking, but I'm not sure what I'll do with them to put them together into a finished quilt. Sashing? No sashing?


But, I couldn't even get that one done because as I was digging through my bag of scraps, there were a ton of long ones. I thought I could sew these together into blocks, then cut them into triangles and sew them back together again to make interesting patterns. Here's what I came up with (although all the blocks aren't pictured - I have 13 of them):

I love doing quilts like this, but they do end up a little... busy. This one is also going to have blocks that are a similar scrappy concept but are formatted as smaller squares separated into a 2x2 grid by a thin sashing. Sashing on this guy is going to be black so as to use up the strips I already had cut to use as sashing for the paintbox quilt (which ended up not having sashing in it).